Fix Your Dell 3100cn Streaking Issue
Dell 3100cn Streaks
Posted by Adam Hayes
Well after owning my Dell 3100cn for a very very very long time, I've finally found out how to get rid of streaks that were running down the middle of the page on color prints.
Well today, I found an answer that immediately fixed the problem within about 2 minutes. I found a great article that shows that the culprit is bad design of the imaging drum inside the 3100cn. Here are the instructions on how to fix it: (This will void your warranty with Dell so DON'T DO THIS IF YOU DON'T WANT YOUR WARRANTY VOIDED. WE ARE NOT RESPONSIBLE FOR ANY DAMAGE THAT OCCURS FROM THESE STEPS:)
- Remove the drum unit from your 3100cn.
- Set the drum unit on a clean level surface and avoid touching the drum or the transfer belt (the decal with 4 arrows points to the transfer belt).
- Remove the 6 screws from the top cover (the cover has the blue handle attached). Two screws are on top at both ends of the blue handle. The next 2 screws are on the sides and line up with the decal with 4 arrows. The last 2 screws are also on the sides and at the lower corners of the big decal that shows how to remove the drum unit from the 3100cn.
- Carefully lift the cover from the drum unit and cover the drum unit with clean paper to protect the transfer belt from bright light. You can carefully reinstall the drum unit without the top cover and run some color prints. If the lines are gone then continue with step 5.
- Look at the ribbed side of the top cover. Some may show some toner build-up. Some of the rib intersections are too high and are dragging in the toner that is applied to the transfer belt. The ribs are there to add stiffness to the cover and to keep it from bowing.
- Place the cover handle side down on a clean towel.
- Using a palm sander with 320 grit sandpaper and light pressure (the weight of the palm sander) sand until the ribs going both directions are showing signs of being sanded. You will be able to see the difference as unsanded areas will be glossy and sanded areas will have a dull finish.
- Switch to 600 grit paper and do a light sanding.
- Wash the cover under cool water. Don't use hot water since that could cause the cover to bend.
- Dry completely. I used compressed air.
- Reinstall the cover to the drum unit. Tighten the 4 side screws first and then the 2 top screws last.
- Put the drum unit back into the 3100cn and try a color print.
- Please post if you have any questions about the procedure.
- If your next drum unit has the same problem you can swap top covers.
Well I am now very happy that my Dell 3100cn prints without any streaks. A little background will help you figure out why I'm so happy.
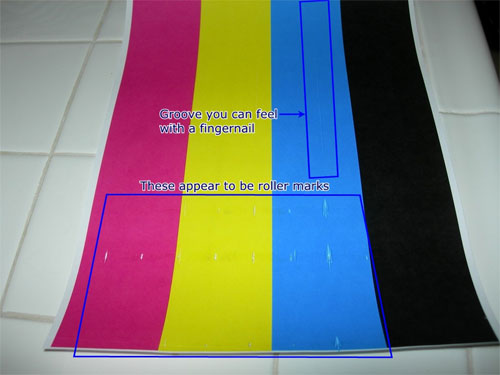
I got a Dell 3100cn printer a couple of years ago. I had a friend that had one and I loved the way it printed and everything about it, so I decided to get one of my own. After setting it up, I printed a few sheets and all of the color prints had streaks or lines that ran down the middle of the page at extremely regular intervals on every print. I called Dell and they shipped me a new printer drum. It didn't fix the problem. They had me ship the printer back and they sent me a used printer. (I was upset because I figured I'd get a new printer... but that is a different story.) This one wouldn't even fire up. It kept giving an error about temperature. They sent out a tech and he replaced some controller. It didn't fix the problem with the error message. So I sent that printer back to Dell.
Finally they sent me another printer that streaked again. I was fed up by then and found that if I printed enough pages the printer would "warm up" and the streaks would go away. So any time we wanted to print anything in color, we'd just print about 150 black and white pages of whatever and then print our color pages.
Leave Comment